SharePoint tool helps users to easily collaborate with other internal & external users/clients/partners. In this article, I will explain to you, how to configure and control external sharing via SharePoint.
Configuration
Let’s go step by step for configuration on the SharePoint Admin center:
- Go to the Microsoft Admin portal.
- Find the option on the left-side pane for the SharePoint admin center or go directly to the SharePoint admin center.
- Open the Policies
- Select the option Sharing.
- Following the control option you can see.
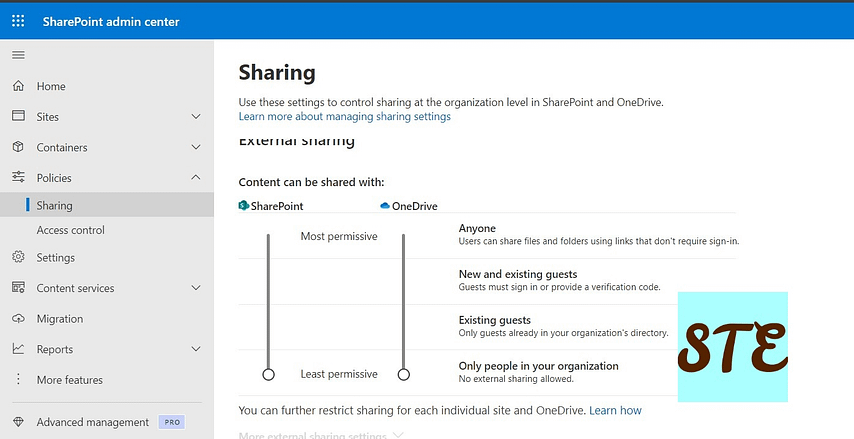
- Currently, both slider options are at least permissive options which means you can’t share data externally.
- Here we will discuss only Sharepoint, for OneDrive we will discuss it in the next article.
- Let’s understand the levels
- Anyone: This option will allow users to share with anyone without any restrictions.
- New and existing guests: This will let users share only with guest account means, IT can create guest account by inviting from Azure AD. For existing no sign up required.
- Only people in your organization: This means “No external sharing at all”.
- When you change the setting from Only people in your organization to any other option “More external sharing settings” get enabled. Let’s check what’s that.

-
- Limit external sharing by domain: This will let admins whitelist specific domains where users are allowed to share externally.
- Allow only users in specific security groups to share externally: Admins will create security groups and assign them here, which means only allowed users of that particular group can share the content externally.
- Guests must sign in using the same account to which sharing invitations are sent: Guests won’t be able to use an organization account to view shared content; they have to log in with their private accounts instead.
- Allow guests to share items they don’t own: This permission allows guest users to share content which they do not own.
- Guest access to a site or OneDrive will expire automatically after this many days: You can set the expiry
- People who use a verification code must reauthenticate after this many days: The user receives a verification code and only after entering the code can they see the content.
- Other settings are simple, you can choose as per your business needs.

- At this stage, your configuration has been done. Now let’s create a SharePoint site and share
Create a Sharepoint Site and assign external sharing permission.
- As you already logged in Sharepoint site, Click on the site from the left-hand menu and click on Active sites

- Create new site
- Select the site and click on the Sharing option on the top side.
- You will see the below screen, choose an option from external sharing and click on save.

- Click Save
That’s it!
Check out more about Intune & I have a specific section for Windows troubleshooting I hope you will like to explore.
Always check the Microsoft Learn website for new study programmes.