The “Windows update keeps failing Windows 11″ issues can be frustrating. Understanding how to address these issues is essential to maintaining a secure and optimized system. This article has explored various reasons, from network connectivity issues to disk space constraints. It offered detailed insights into troubleshooting methods to resolve the issue effectively.
Why Does Windows 11 Update Keep Failing
Windows 11 updates may fail due to several reasons. Here are the possible causes behind the issue:
- Insufficient Disk Space
- Internet Connection Issues
- Windows Update Service Issues
- Background Processes and Services
- Corrupted System Files
- Pending Updates
- Outdated or incompatible drivers
- Security software can sometimes block updates
- If you have set your internet connection as metered, Windows might postpone updates
How to Fix Windows 11 Update Keeps Failing
Windows update issues can cause security risks to your computer. Here are the effective ways to fix the Windows update failing or Windows 11 cumulative update failing to install.
Fix 1: Check Network Connection
Your connection strength plays a significant role in updating Windows 11. If the internet connection is unstable, it may cause Windows update errors. Follow the steps to check and improve your internet speed:
- Check the Network icon.
- Enable Network connection.
- Right-click the network icon in the taskbar.
- Select “Network and Internet Settings.”
- Go to “Dial-up” and select “Change adapter options.”
- Select the network connection you want to use.
- Click “Enable” to activate the network connection.
- Restart Router/Modem.
- Disable VPN and proxy. These can affect your internet connection and Windows update process.
Fix 2: Remove All Peripherals from Your PC
Devices connected to your computer can also cause update issues. A damaged peripheral can affect the update process; disconnect all peripherals. Connect them one by one to see if they cause the issue. Follow these steps to solve the issue:
Step 1. Remove all peripheral devices from your computer.
Step 2. Restart your computer.
Step 3. Try updating Windows 11 now.
Step 4. Reconnect Peripherals One by One.
Step 5. If the updates are successful after removing peripherals, reconnect each device one at a time.
Step 6. After connecting each peripheral, check for updates again to identify if a specific device causes the update failure.
Step 7. Install the latest drivers for all peripherals. Check if they are compatible with Windows 11. Some older devices are incompatible with the latest operating system and cause update issues.
Fix 3: Temporarily Disable Antivirus Software
Antivirus software can also restrict the Windows from updating. Disable the antivirus software and run Windows Update again. After the update is completed, re-enable the Antivirus again. Follow these steps to disable Antivirus.
Step 1. Open your antivirus software.
Step 2. Go to Manage Settings.
Step 3. Find options like real-time protection or active scanning. Temporarily disable these features.
Step 4. Update your windows.
Step 5. After updating, re-enable the real-time protection features.
Fix 4: Check the Free Disk Space
Windows requires 64GB of free space to update your operating system. The Windows 11 update may fail or stop with low storage space. Make sure to have enough C drive space available to update your Windows. Follow these steps to check disk space on Windows 11:
Step 1. Open File Explorer on your computer.
Step 2. Go to “This PC” in the left sidebar of File Explorer.
Step 3. Open C drive properties.
Step 4. Check the “Free space.”
Step 5. If the storage space is low, you need to free up space.
Fix 5: Restart Windows Update-related Services
Updates may fail due to damage in the Windows update files. Delete these files and restart the update process to resolve the issue. You can manually delete the Windows Update files in Safe Mode. Follow these steps by running the taskbar type command prompt to solve the update issue.
Step 1. Restart your computer.
Step 2. Boot to Safe Mode.
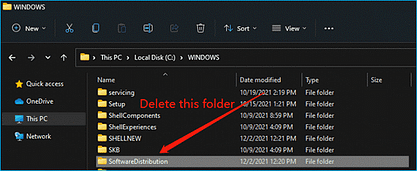
Step 3. Open the C:\WINDOWS\ directory on your system.
Step 4. Select the “SoftwareDistribution” folder and delete it. This folder contains the Windows Update files. You may encounter a message stating that some files are in use. If prompted, skip those files.
Step 5. Restart your computer to exit Safe Mode.
Step 6. Try updating to Windows 11 now.
Fix 6: Run Troubleshooter
The troubleshooter can find the issues affecting the update process. You can use the troubleshooter to solve the issue. Follow these steps to fix the Windows update issue using the in-built tool:
Step 1. Open Settings.
Step 2. Click on “Update & Security“.
Step 3. Access Troubleshoot Settings.
Step 4. Click on “Additional troubleshooters.”
Step 5. Select Windows Update.
Step 6. Tap “Run the troubleshooter” to start the process.
Step 7. Follow On-Screen Instructions.
Step 8. Review the results to see if any issues were detected and resolved.
Step 9. Restart your computer to apply any changes or fixes made by the tool.
Fix 7: Run SFC or DISM Command
Corrupted Windows system files can also affect the Windows update issue. Run the System File Checker to fix the system files. It’s recommended to run the Deployment Image Servicing and Management tool before SFC in Windows 11. Follow these steps to run SFC scannow and DISM commands.
Step 1. Search “Command Prompt” in your Windows menu.
Step 2. Select “Command Prompt.”
Step 3. Click on “Run as administrator.”
Step 4. Run DISM Command.
Step 5. Type this command and tap Enter:
“dism.exe/Online/Cleanup-image/Restorehealth”
Step 6. Allow the DISM tool to complete the process. This may take some time.
Step 7. After the DISM process is complete, type this command and press Enter:
“sfc /scannow”
Step 8. The SFC will repair corrupted system files.
Step 9. Review the results shown in the Command Prompt window once the SFC scan is complete.
Step 10. If issues are found and repaired, restart your computer.
Step 11. Check for updates again to see if the Windows update process can be completed successfully.
Fix 8: Reset Windows 11
If all the methods fail, consider resetting Windows 11. It involves reinstalling the Windows, and backing up your data is crucial. Follow these steps to reset Windows 11.
Step 1. Back up your data using a reliable backup tool.
Step 2. Open your Windows 11 computer settings.
Step 3. Access Windows update settings.
Step 4. Click on “Reset this PC.”
Step 5. Reinstall Windows 11.
Check out more about Intune & I have a specific section for Windows troubleshooting I hope you will like to explore.
Always check the Microsoft Learn website for new study programmes.